Saturday 29 August 2009
GREAT news!
Cherry Cheesecake's jewelery is now on display and for sale at 'Totally Local' in Swanage, Dorset! Please check them out in there if you wish! :)
I have de-listed my items on the Coriandr site for now but will hopefully re-list them back on there soon.
Ta-ra for now!
Katie@ Cherry Cheesecake
Posted by Cherry Cheesecake at 17:36 0 comments
Monday 3 August 2009
I'm back!
WOW! These past few months have been incredibly busy, popped on holiday for two weeks which was amazing, started a new job in a cute girly shop and since then it's been non- stop. SO, unfortunately I haven't been doing any more Cherry Cheesecake making :(
BUT, I have re-listed my items back on Coriandr AND have put a sale on! Absolute bargains!
I am really hoping to somehow get an official Cherry Cheesecake website up and going, but it's just how I'm going to get it done. and paying for one. Unless anyone knows how to get one for free? Haha, in my dreams.
SO, hopefully in Dec I will still be featured in The lipstick Royalty magazine for Cherry Cheesecake, not 100% sure if it's going to go ahead, but I'll keep you all updated.
Ta-ra for now!
Cherry Cheesecake's mummy
Posted by Cherry Cheesecake at 21:22 0 comments
Wednesday 17 June 2009
Update! New website!
FINALLY!
I have a website where I can finally sell my things online, Thanks to Coriandr.com!
To browse, or even better-buy:
Cherry Cheesecake Official Site
Please check out these other Cherry Cheesecake Links too!
Facebook Group
Facebook Fan Page
Twitter
Posted by Cherry Cheesecake at 22:37 0 comments
Tuesday 26 May 2009
Nautical Top
I love charity shops, they sell anything for next to nothing and most of their things are still in great condition. I managed to find a plain but interesting Laura Ashley top, for just £2.00. Bargain!
Why I chose it is because it of the cute buttons on the side which I thought looked interesting. Anyway I took it home and started cracking on with it.
Firstly, I cut out a anchor shape with a heart on the top of it out of cardboard, then I drew around it onto felt which I was going to put onto my top.
After this, I stuck it onto my top using a very strong fabric glue, and then started sticking my sequins onto the anchor, which was a bit painstaking as it took a while, but worth it!
After that, I stuck some little gems onto the top and created a shape of an anchor, simple but effective! I didn't want to put too much on my top so I thought it would be good to add the finishing touch which was a little bow out of polka dot ribbon and put it onto the neck part of my top.
Anyway, here are some photos of the progress of my top and finished!
Ta for now, Katie at Cherry Cheesecake
Posted by Cherry Cheesecake at 21:22 0 comments
Ladybird bags!
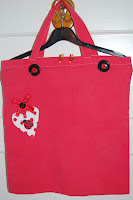
I thought of a doing a theme for my bags, so I decided....Ladybirds! :) They're cute and every girl loves them!
Firstly, I brought some plain bags, dyed them all red and made little bows out of polka dot ribbon which I then sewed onto the bag.
Also, I sewed the buttons onto the bows and onto the edge of the bag.
I cut out hearts out of polka dot felt, glued them on and put the ladybirds on and for a finishing touch, put on some little ladybird pegs and Voila!
Hope you like them! Katie at Cherry Cheesecake
Posted by Cherry Cheesecake at 20:56 0 comments
Earrings!
Heyyyy there!
I've recently started making my dangly earrings, which has gone pretty well!
I brought a bag of random charms and decided to attach them & some star sequins onto a chain, and add on the earring hook and jump hoops, etc.
So, I hope you like them! I've made about 30+ so far so it's going pretty well! :)
Ta-ra! Katie at CherryCheesecake


Posted by Cherry Cheesecake at 20:25 0 comments
Monday 13 April 2009
New & updated ornaments part II
These are my finished ornaments! Only some of the apples are photo holders and the rest of the ornaments are just...ornaments, haha. I tried to take a single photo of my Miss. Strawberry but the camera was being abit silly. Oh well, I hope you all like them anyway! :D
Katie
Posted by Cherry Cheesecake at 23:09 0 comments
Sunday 12 April 2009
New &updated ornaments!
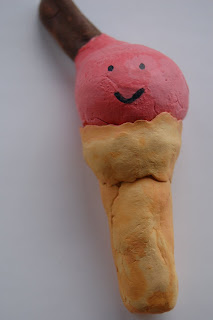
Lately I've been getting my hands dirty by digging into Fimo clay and getting on with making my little character ornaments!
I started off by practicing with the Fimo clay and created these two little fruities.
They are both photo holders, and I attached funny little googly eyes which look better than drawing the eyes on. Fimo clay is amazing to use, it's easy, non- messy and you can quickly create whatever you want with it. Only half an hour in the oven and viola, they clay has set perfectly.
Today (12th April- Easter day!) , I started to make lots of my Miss. strawberries, Mr. apples and Mrs. grapes. This took a long time but it was well worth it! I apologize for the brightness of my fruits! :D
I used a cocktail stick to make holes into the strawberries to create the textured look. The grapes took a long time to do as I was rolling lots of little balls for a while and my hands were soon very very purple...! The apples were easiest and quickest to make. I pierced a little hole in each of them except the grapes (I want the grapes just to be ornaments) so after they are baked I can put wire photo holders in them.
I am due to put on the googly eyes and the wire holders in and hopefully you will all like the finished result. :D
Ta-ra for now!
Katie
Posted by Cherry Cheesecake at 22:22 0 comments
Wednesday 1 April 2009
A little preview...
So lately I h ave been:
Making little plush felt birds, I'm not sure what I am going to use these for yet I originally want to put them on a headband. I figure I can use them for other bits too. I really love making them, today I made a little felt elephant, he needs a bit of tweaking still but here he is. 
Sorry about the photos, I am having some camera troubles at the moment, so I will post some better pictures when I have it sorted, but you get the idea.
So what else have Cherry Cheesecake been up to?
Coming soon: Wire necklaces, crochet purses, bags, hairbands and more.
Just a little update from me, speak soon.
Luv with cherries on top
Coley
Cherry Cheesecake x
Posted by Cherry Cheesecake at 20:10 2 comments
Monday 30 March 2009
Arty Crafty making! By Katie.
Today I got my fingers stuck into my 'Das' clay and got on with making my little photo holders/ornaments. This took me allllllll day but I think it was worth it as I was quite pleased with the end result!
Firstly, I made this little chap. He is Mr. Apple (How original!), and I decided to turn him into a little photo holder. He is very small, but when I make another of him I will size him up. With 'Das' clay, it dries very quickly, so by the time I made my ornaments/photo holders, they were ready to be painted straightaway.
I used watercolour paints because they go on better and it's quite thick so you don't have to put on lots of coats. Then to make the paint dry even quicker I used my hairdryer, and amazingly the paint would dry in less than literally 20 seconds! This was good to do because I wouldn't get paint all over my fingers whilst trying to paint the other bit of the ornament! I wanted them to be dry for their photo session anyway :D
The wire I used was so easy to bend, so I made some little holders, twisted or bent some to make them look funky, and stuck them into my ornaments heads (poor things!)
Here are the others I made!
Miss. Strawberry


Posted by Cherry Cheesecake at 21:47 0 comments


